What do you usually do when you want a customized ringtone for your iPhone? Buying one from iTunes Store or creating a unique ringtone from the music you already have, such as Apple Music tracks? For those who have already paid for Apple Music service, you probably want to use a specific Apple Music track as ringtone on iPhone. In fact, that's a good idea and not a hard thing to accomplish.
In this post, I'll show you how to set Apple Music as ringtone step by step. You can choose any of your favorite songs from Apple Music library and create your custom ringtone easily. Here's how.
You May Like:
How to Use Apple Music as Ringtone on iPhone with iTunes?
iTunes has the feature of transferring songs between your computer and your iPhone. You can easily turn a song from Apple Music to a ringtone and transfer it to your iPhone after ripping the song off Apple Music with a converter.
Requirements
TuneFab Apple Music Converter – To convert any Apple Music song to a M4A file
iTunes – To transfer song from computer to iPhone
Why these tools are required?
As you might already know, that Apple Music songs are not available in the list of ringtone options on your iPhone even though they're downloaded locally on your iPhone. Why? Well, to make an iPhone M4R ringtone from an existing song, such as MP3 or AAC file, you need to convert it into iPhone M4R ringtone file.
But the difficult part of turning Apple Music into iPhone ringtone lies in the fact that Apple Music tracks are protected M4P files. Locked by Apple's FairPlay technology, it is impossible for you to convert Apple Music to M4R ringtone with iTunes.
Under such circumstance, a specialized Apple Music Converter will be very useful because it can help you get DRM-free Apple Music songs in a few clicks and after that, you can import them into ringtone creator or software and create custom ringtone for your iPhone 13 Pro Max, iPhone 13 Pro, iPhone XS, iPhone X, iPhone 8, iPhone 7, etc.
I highly recommend that you use TuneFab Apple Music Converter. It is capable of converting Apple Music to plain MP3, AAC, M4A, FLAC, WAV and other popular audio formats. You can check out our TuneFab Apple Music Converter review to fully understand all its amazing feature.
Now I will show you how to set Apple Music as ringtone on iPhone using iTunes in 3 steps.
1. Rip Song off Apple Music [Removing DRM]
2. Turn a Song into a Ringtone on iTunes
3. Set the Ringtone on iPhone
1. Rip Song off Apple Music [Removing DRM]
Step 1. Download TuneFab Apple Music Converter and finish installation. If you are using the free trial version, you can only convert 3 minutes for each song, which should be enough for making ringtone though.
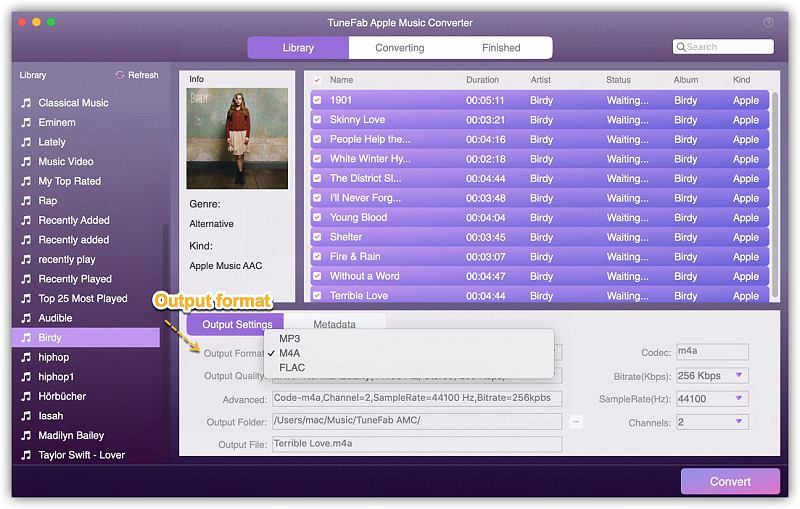
Step 2. Launch the program and select the song you want to set as ringtone. Choose 256 Kbps M4A as output format just like the normal setting of an Apple Music song. When finished the output settings, click "Convert" to start the conversion.
Step 3. When it says "Completed" in the status, you can click the output folder and get unprotected Apple Music on your PC.
2. Turn a Song into a Ringtone on iTunes
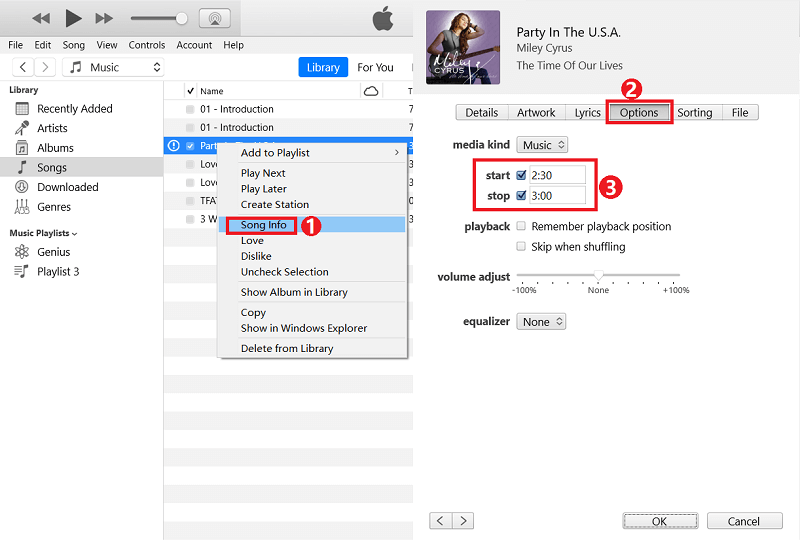
Step 1. Now launch iTunes and drag the song from the folder to iTunes. Then play it and mark down the start time and stop time of the ringtone part you need. Right-click on the song title and select "Song Info". In the pop-up window, go to tab "Options". Set the duration of the ringtone and hit "OK".
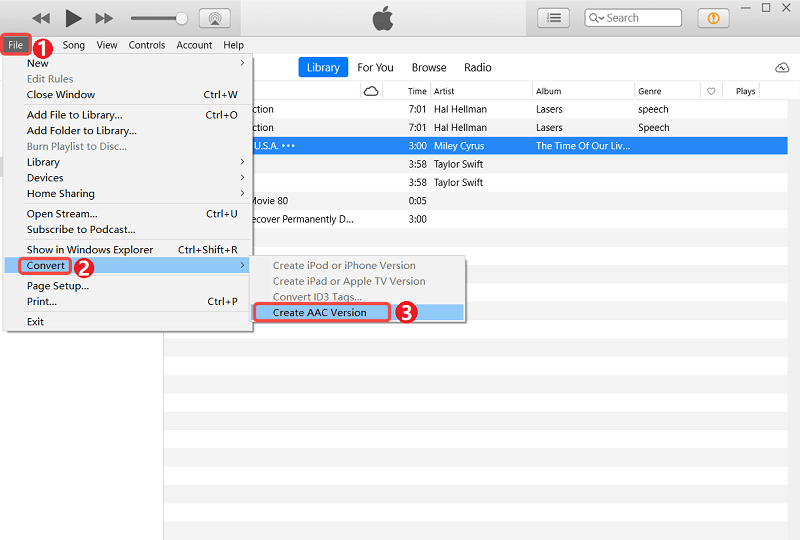
Step 2. Click "File > Convert > Create AAC Version" from the iTunes menu. Then iTunes will create a ringtone file that you can find under the original song. On Mac, you can right-click on the song and find "Create AAC Version" directly.
Tip:
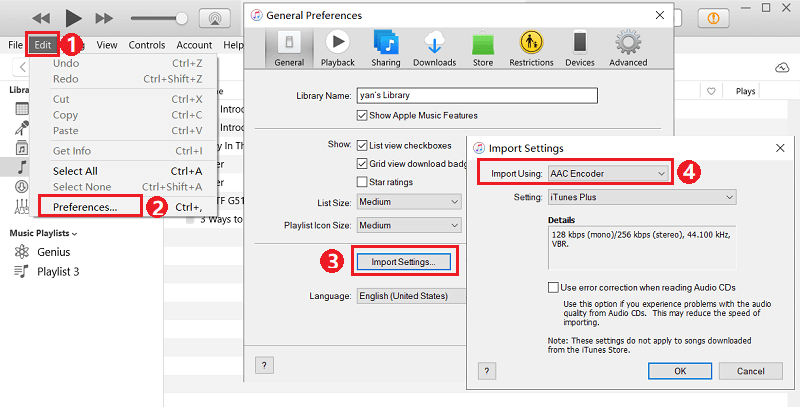
If you can't find "AAC Version", navigate to "Edit > Preferences… > General > Import Settings > Import Using" and choose "AAC Encoder".
Step 3. Right-click on the ringtone that has been generated (You can tell it from the original one by its duration). Then hit "Show in Windows Explorer" to get find the ringtone file. if you are using a Windows computer. On a Mac it will say "Show in Folder".
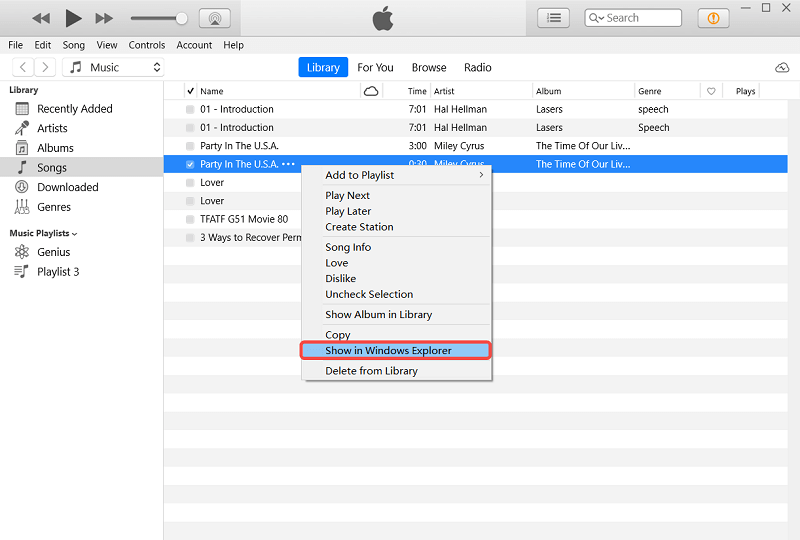
Step 4. Rename the ringtone file by changing its extension from M4A to M4R.
Tip:
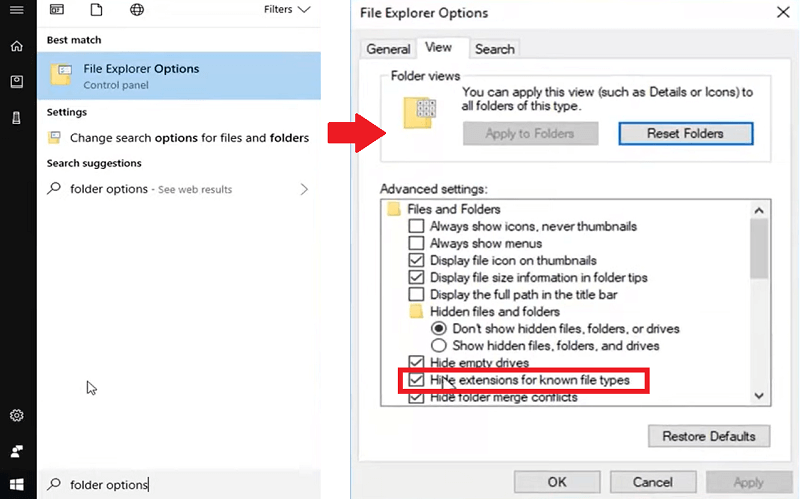
If you can't see the extension of the file. Try shortcut "Win + S" to launch the File Explorer Options. Go to tab "View" and under "Advanced settings", scroll down and untick "Hide extension for known file types".
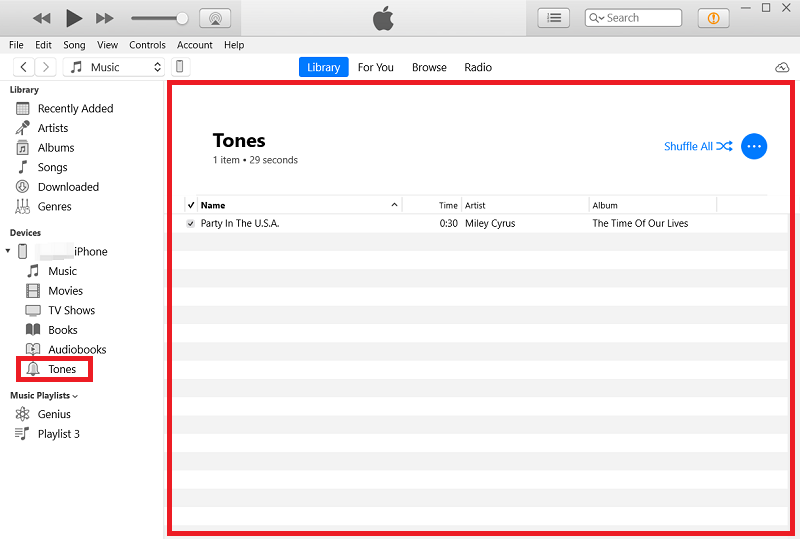
Step 5. Connect your iPhone to your computer with a USB cable. Then Click "Tones" under the "Devices" on the left panel. Drag the M4R ringtone file to the tone list on the right part on iTunes to get it transferred to your iPhone.
3. Set the Ringtone on iPhone
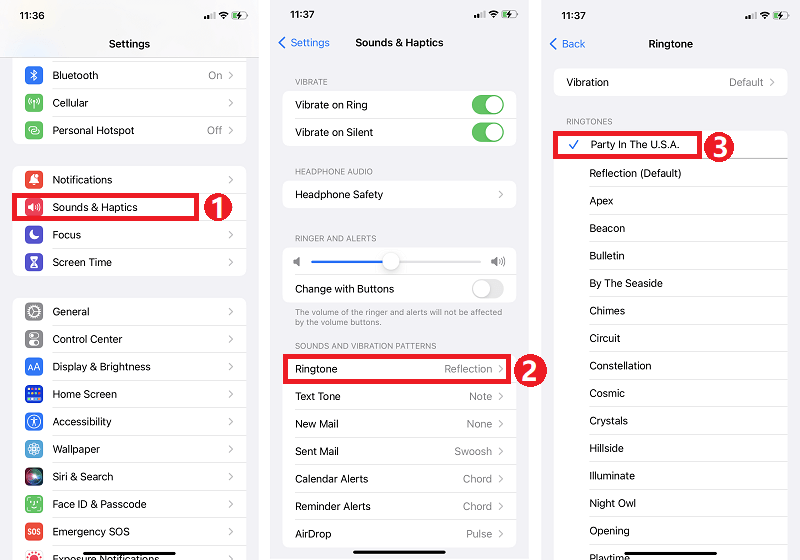
Step 1. Open "Settings" app on iPhone, find and click "Sounds & Haptics" on iPhone 7 or later ("Sounds" on others).
Step 2. Scroll down and click "Ringtone", then you can see the newly created Apple Music ringtone appeared at the top of the default iPhone ringtone list.
Step 3. Tap at the song you want to set as ringtone and it's all done.
How to Make Apple Music a Ringtone Without iTunes?
If you don't install iTunes on your computer, or you prefer adding fade-in, fade-out, volume or other effects for the ringtone, you should try this way, making the Apple Music a ringtone on your iPhone and then set it up.
Next, I'll walk you through the procedure. It involves the following 4 steps to convert Apple Music to iPhone ringtone.
1. Unprotect Apple Music Tracks
2. Add Apple Music to Ringtone Maker App
3. Create Ringtone from Apple Music Songs
4. Set Apple Music as Ringtone on iPhone
Requirements
TuneFab Apple Music Converter – Still need to remove DRM protection first
GarageBand – An iPhone ringtone maker app to create ringtone out of a song
1. Unprotect Apple Music Tracks
This step is just like you do with iTunes. You need to use TuneFab Apple Music Converter to get rip of the DRM restriction and download the songs to a M4A file separately. Here's the simple guide on how to download Apple Music.
Step 1. Download TuneFab Apple Music Converter, install and launch it.
Step 2. Find the song you wish to make ringtone of from the library on the converter.
Step 3. Select M4A as the output format and hit convert.
2. Add Apple Music to Ringtone Maker App
After downloading DRM-free M4A from Apple Music, you can transfer these songs from PC to your iPhone for making ringtone on iPhone. With tools like iTunes, Dropbox, OneDrive or iCloud Drive, you can easily save the converted songs locally on your iPhone. Here we use Dropbox as an example.
Step 1. On PC, sign in Dropbox and upload the converted Apple Music songs into Dropbox folder. Then sign in Dropbox on your iPhone and make sure all songs are synced to your iPhone successfully.
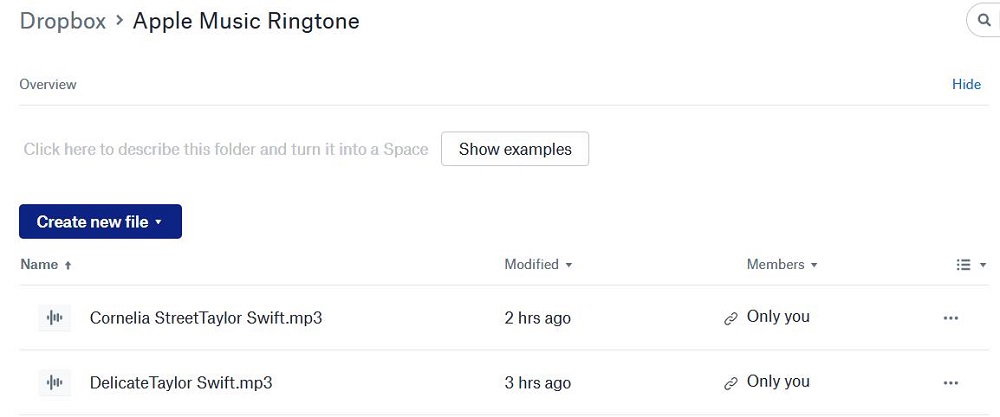
Step 2. Download and install two apps on your iPhone, one is RingtoneMaker, and the other is GarageBand.
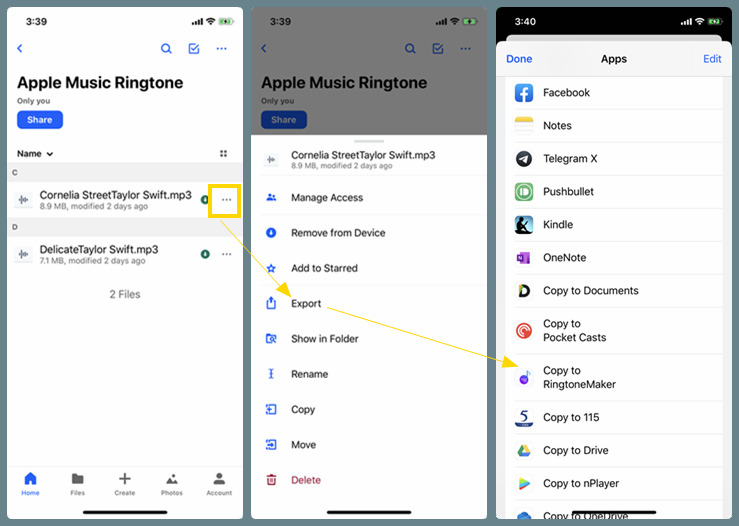
Step 3. Now open Dropbox app on iPhone and select the song you want to set as ringtone and click at "...", tap at "Export" > "More" and choose "Copy to RingtoneMaker". Then the song will be added to the RingtoneMaker app.
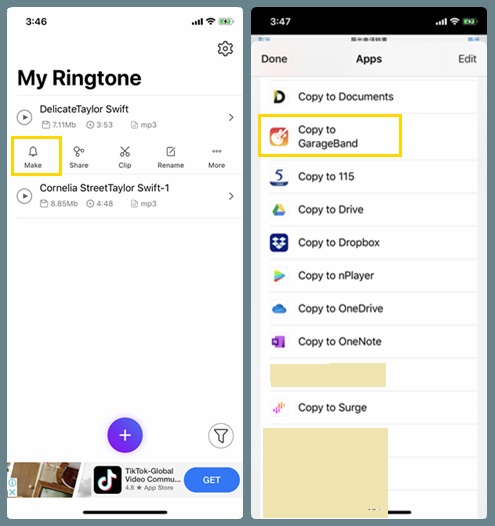
Step 4. Select a song in RingtoneMaker app and click at the "Make" icon, then slide left in the pop-up windows below, find and click GarageBand icon. Then you will be directed to GarageBand and the song will be added to GarageBand's "Recents" section.
In the following part I will show you how to use GarageBand to make ringtone with the imported songs.
3. Create Ringtone from Apple Music Songs
Step 1. On GarageBand, go to Audio Recorder. Tap the broken wall icon and you will see the studio. Click the triangle icon next to the red recording button to avoid other sound from your background. Then hit the loop icon, got to tab "Music" and go to "Songs" to find the ringtone. Drag the item to the track.
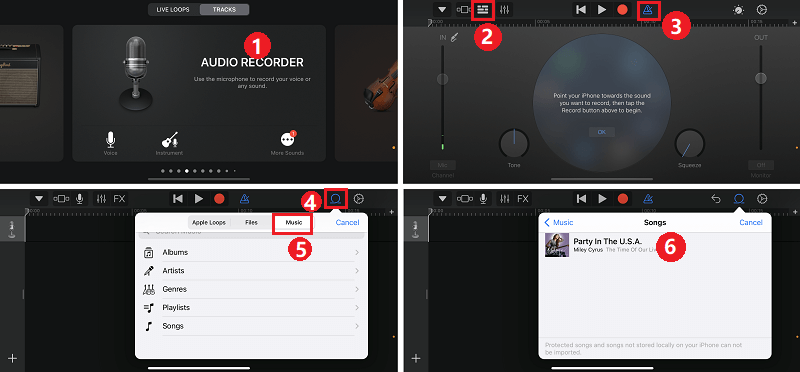
You can adjust the ringtone length and other output settings, such as volume, audio effects and automation fade in, fade out, etc. by tapping on the microphone icon on the left of the tract. Please note that ringtone needs to be 30 seconds or less otherwise this app will automatically adjust your ringtone to the appropriate length.
After editing the ringtone, click at the upper left button and click "My Songs" to go back to the song list.
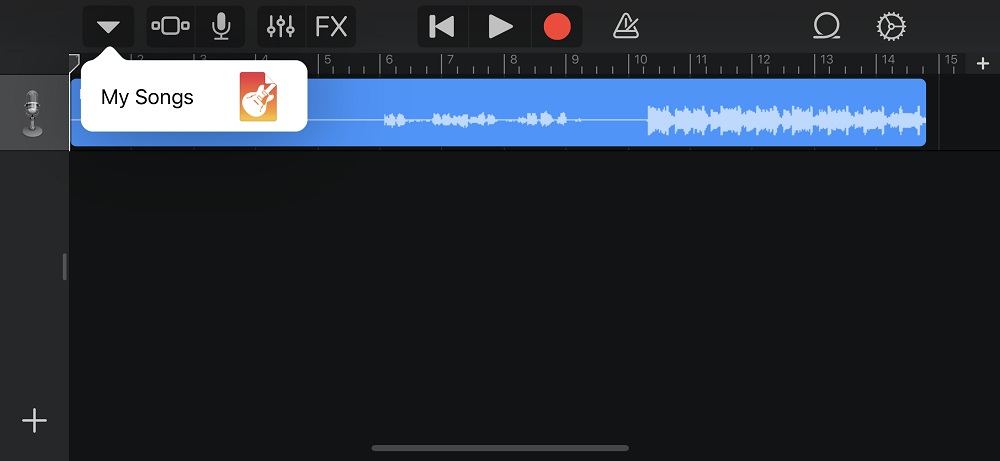
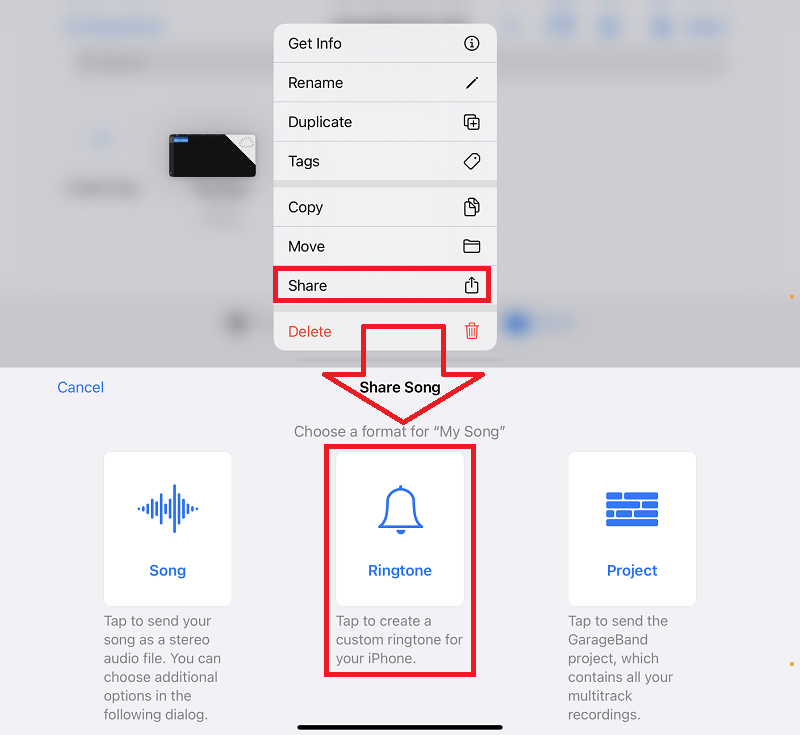
Step 2. Switch to the "Browser" section and long press the music file and click at "Share". Choose "Ringtone" from the pop-up window.
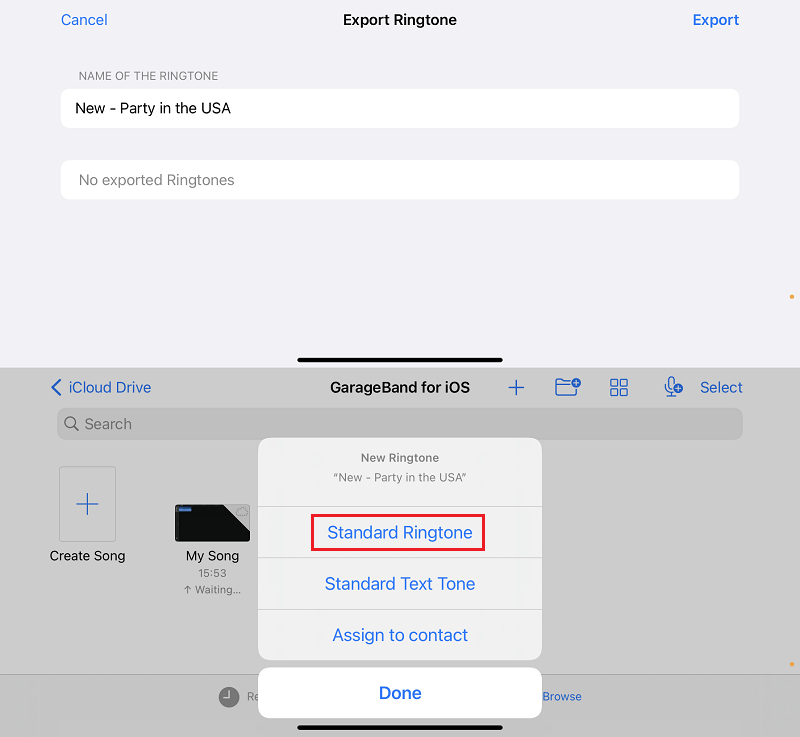
Step 3. Edit the name of your ringtone and click "Export". A few seconds later, you will see a pop-up message asking you to choose a ringtone type: Standard Ringtone, Standard Text Tone and Assign to Contact. Here I pick "Standard Ringtone".
It's done! You have successfully created a ringtone for iPhone with the songs you downloaded from Apple Music library. And at this moment, your ringtone has been set as the one you created just now. You can doublecheck it via "Setting > Sounds (or Sounds & Haptics) > Ringtone".
Alternative Ringtone Maker for Apple Music - FonePaw DoTrans
However, if GarageBand or iTunes is complex for you to handle, here's a much simpler tool that you might be interested in. It's called FonePaw DoTrans.
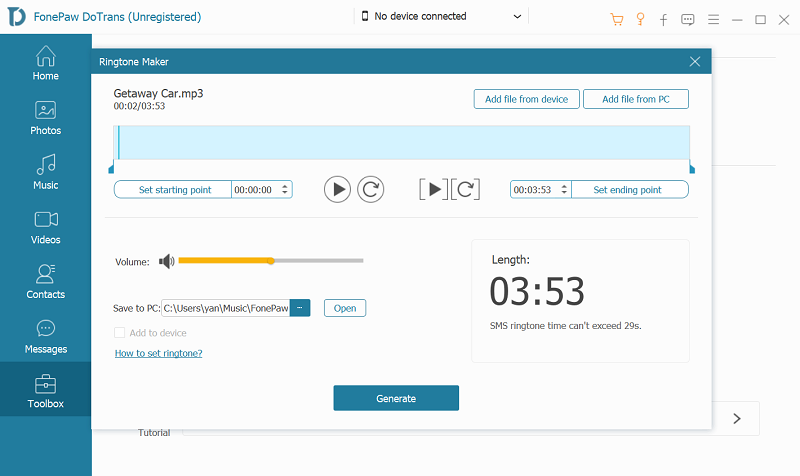
FonePaw DoTrans is built with a feature that lets you create ringtone for iPhone with local music files on PC, and when the ringtone is done, you can directly transfer it back to your iPhone, without using iTunes. This software lets you add song from computer/iPhone and turn it into an M4R ringtone file. Compared with iTunes, FonePaw DoTrans is much more convenient because it allows you to edit iPhone ringtone length, ringtone volume, ringtone starting and ending point, etc.
It's simple to use as well:
Step 1. Launch FonePaw DoTrans on PC.
Step 2. Connect iPhone to PC and open the Toolbox.
Step 3. Add DRM-free Apple Music song to the ringtone maker program.
Step 4. Set iPhone ringtone length and click "Generate" to create M4R ringtone for iPhone.
Step 5. Automatically transfer the generated ringtone back to iPhone and use Apple Music as ringtone.
Conclusion
This is how you can set Apple Music song as iPhone ringtone for free. In conclusion, you can make a ringtone with iTunes, GarageBand and DoTrans and iTunes is the easiest way. But before you can do that, songs that are with DRM protection from Apple music need to be converted to M4A files with TuneFab Apple Music Converter first, then you can make ringtones using the songs.


