Apple Music is such a great service that allows you to listen to music across different devices. However, if you want to put Apple Music songs onto a disc, that's undoubtedly a tough task. Whether you are going to create a mix CD of your favorite Apple Music songs or burn music to a CD to play in the car, there's one technical difficulty that you should be aware of – the DRM encryption from Apple.
But still, there are some workarounds. This guide will show you how to burn Apple Music to cd on Windows and Mac.
Related Article: How to Convert Apple Music to MP3
1. Can You Burn Apple Music to a CD?
Yes, but Apple Music songs cannot be burned to disc in a direct way. Because they are encrypted by Apple's DRM code. The only workaround is to decrypt Apple Music DRM and convert Apple Music songs to CD-compatible format like MP3. After that, you can put Apple Music files on a blank CD and burn them to disc with your CD burner.
In the following, I will list the things you need to burn Apple Music to CD and show you how to convert Apple Music to MP3 in part 3.
2. All Things You Need to Burn Apple Music to CD
Before you start to burn Apple music, you need to prepare for it. As is mentioned, you need a music converter, one blank CD, and 2 tools for CD burning.
#1 Apple Music Converter
To burn Apple Music song to CD, you have to convert all your favorite songs into MP3 formats or any other formats that supports to burn to a CD. Thus, a powerful Apple Music converter is a necessity.
#2 A CD burner (a recordable CD-R or CD-RW drive)
If there is no built-in CD burner on your computer, you have to buy an external CD burner to burn Apple Music of MP3 formats to CD.
#3 A blank and recordable disc
A storage medium where you can save Apple Music Songs.
#4 CD burning program
iTunes or other free disc burning software on Windows or Mac to burn MP3 songs to CD.
3. Convert Apple Music Tracks to MP3 with Music Converter
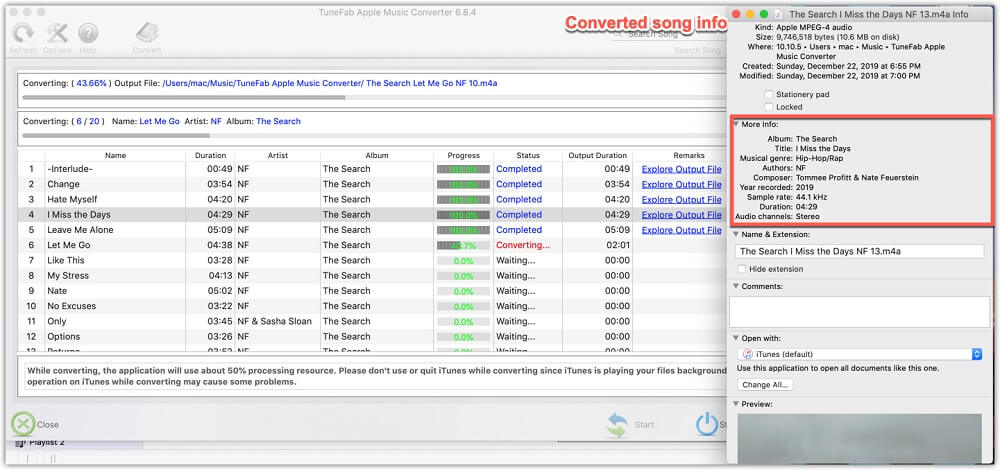
TuneFab Apple Music Converter is a specially designed converter that can convert Apple Music tracks to several output formats including MP3, M4A, WAV and FLAC. After conversion, all songs from Apple Music are no longer encrypted so that you can use them freely, including burning Apple Music to CD.
TuneFab Apple Music Converter
● Download Apple Music to MP3, M4A, WAV and FLAC with the built-in Apple Web Player.
● Convert songs in high quality with sample rate and bitrate editable.
● Get Apple Music playlists converted in batches.
● Support 1X and 5X conversion speed on Mac.
● Support up to 10X conversion speed on Windows.
● Preserve full ID3 tags and meta information.
● Batch conversion allows you to unlock entire albums in just minutes
It takes 4 steps to unprotect Apple Music songs:
Step 1. Get TuneFab Apple Music Converter Ready.
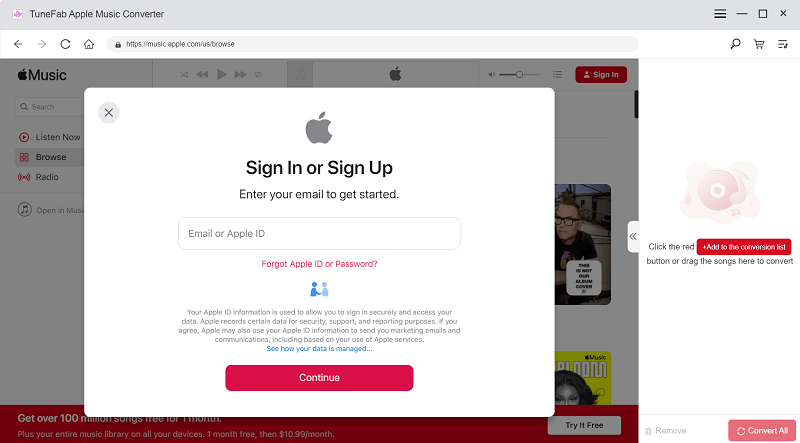
Download, install and run TuneFab Apple Music on your PC or Mac. After entering the Apple Web Player, sign in your Apple ID to go to the main interface of Apple Music.
Step 2. Select Songs to Convert
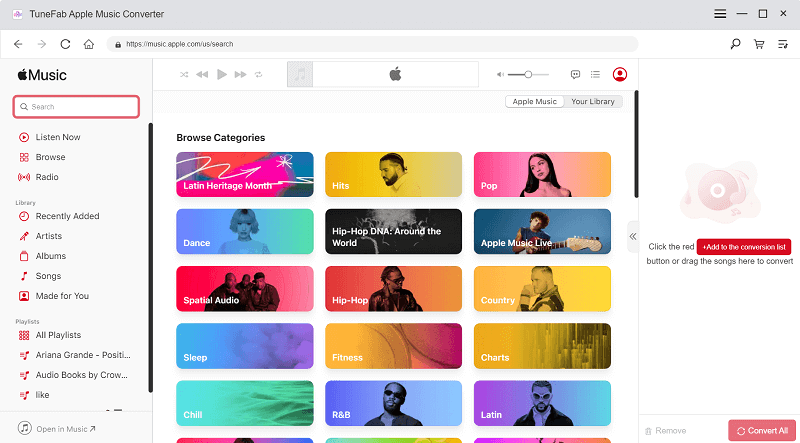
Click the playlist in left side and then choose those songs you want to burn to CD. You can choose a whole playlist too.
Step 3. Select Output Format and Quality
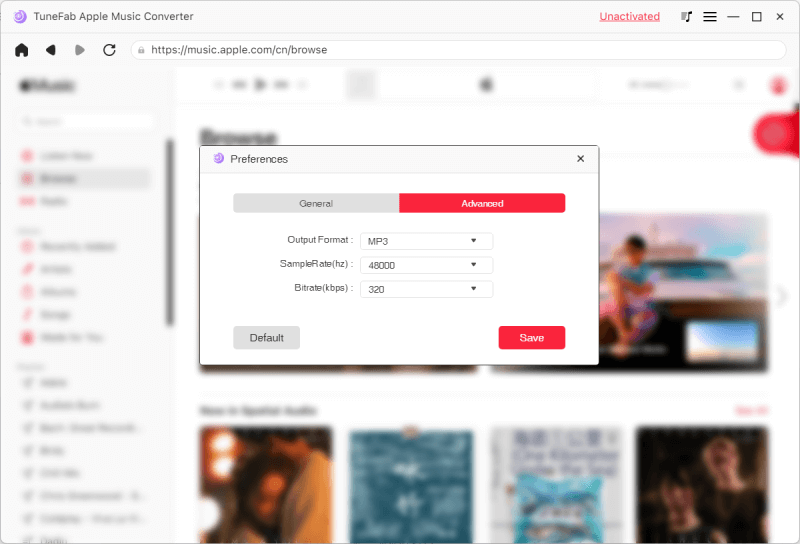
Choose MP3 format, and adjust the bit rate, sample rate, etc. of the songs. To keep the original quality, you can set bitrate as 320 Kbps and sample rate as 48,000 kHz.
Step 4. Convert Apple Music to MP3
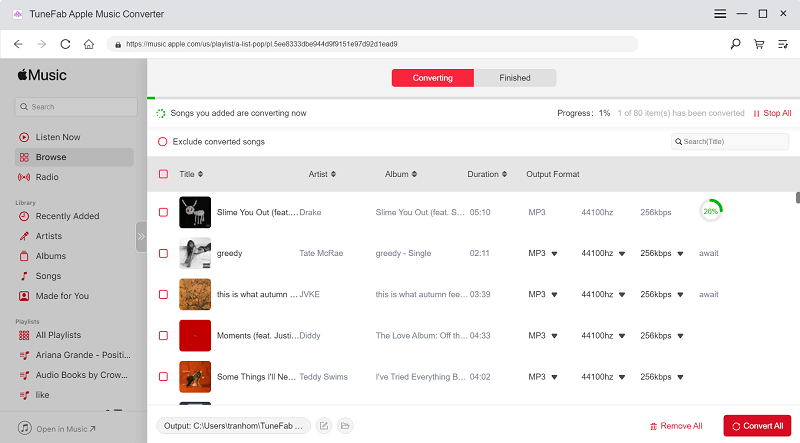
Click "Convert" to start conversion. After conversion, you can get the MP3 versions of your Apple Music songs.
When your Apple Music songs are ready to be burned to disc, you can choose iTunes or other CD burner to start burning a CD.
4. How to Burn Music from iTunes to CD
At first if you haven’t finished converting Apple Music songs into MP3 or other formats compatible with CD, and you just burn iTunes playlist to CD, the burning might fail. And iTunes might remind you that “Some of the files cannot be burned to an audio CD. Do you still want to burn the remainder of this playlist?” Now you get all your favorite Apple Music songs converted to MP3, so there is no need to worry about that.
Here's how to burn a CD with iTunes:
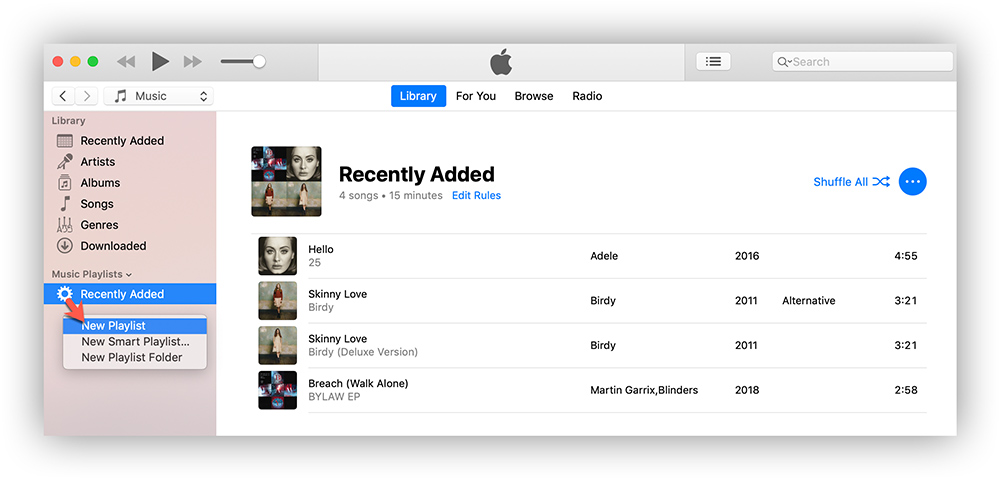
Step 1 Open iTunes, create a new playlist (click on File > New > Playlist), name it and then drag these converted Apple Music songs to this playlist.
Step 2 Insert a blank CD disc, waiting until the disc is recognized.
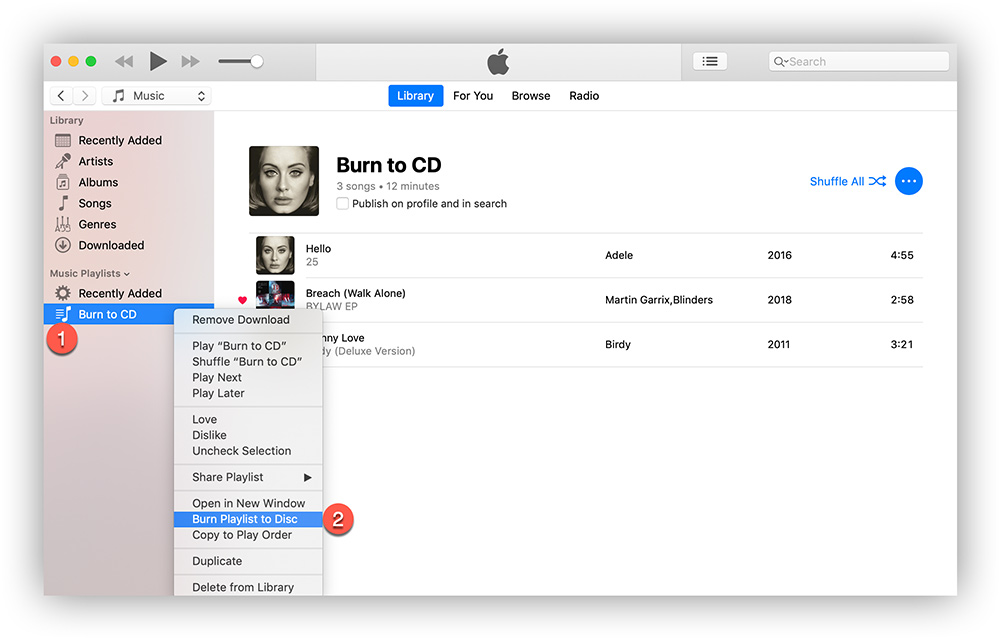
Step 3 Select the playlist and choose File > Burn Playlist to Disc.
Step 4 Select a disc format and click "Burn". Then iTunes will start burning a CD from Apple Music songs.
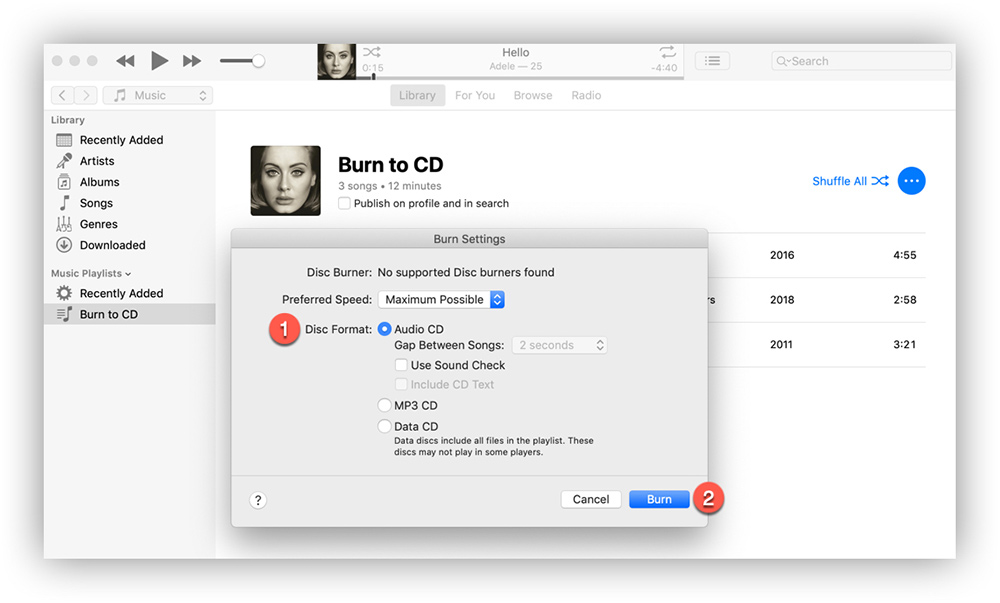
Tips: Be sure to select "Audio CD" or "MP3 CD" rather than "Data CD" because these disc format are playable on ordinary CD players.
5. Burn Apple Music to CD Without iTunes on Windows
Without using iTunes, you can also use some professional program to burn Apple Music to CD. mgBurn is the one which supports lots of audio formats such as AAC, APE, FLAC, M4A and MP3. Besides CD, you can also burn files to DVD, HD DVD or Blu-ray on this tool. Moreover, it's totally free to use. Here's how to create an audio disc with a free CD burning programs on Windows.
How to Burn Apple Music to CD on mgBurn:
Step 1 Download mgBurn and get it running, and select "Write files/folder to disc" from the main interface.
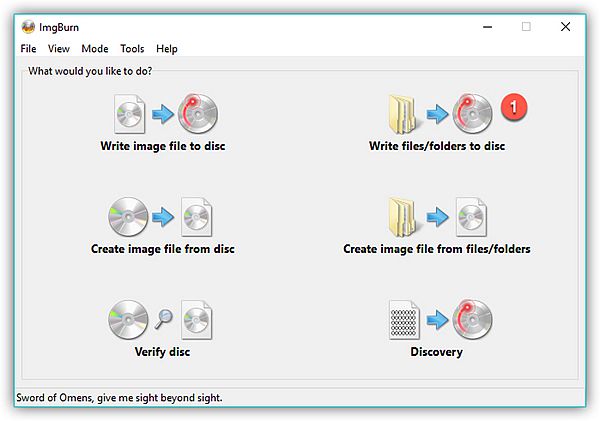
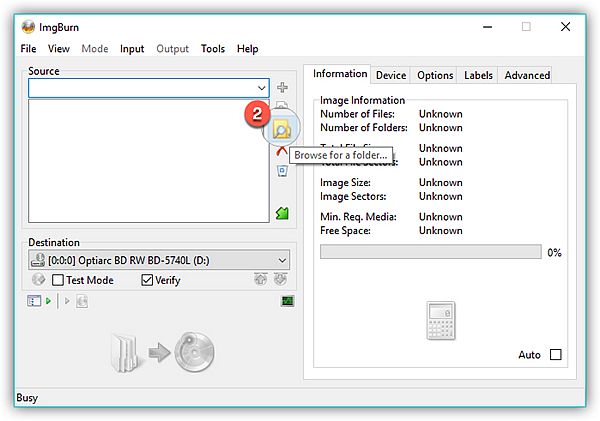
Step 2 Click "Browse for a folder" icon to import a bunch of Apple Music files at a time. You can save all the songs you want to burn onto a disc in the same folder.
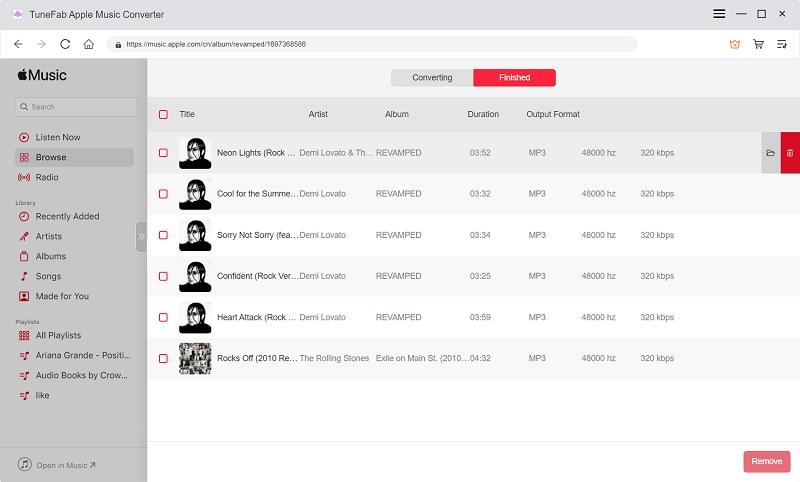
Tip: To reach the downloaded Apple Music via TuneFab Apple Music Converter, go to the "Finished" tab and click "View Output File" on this app.
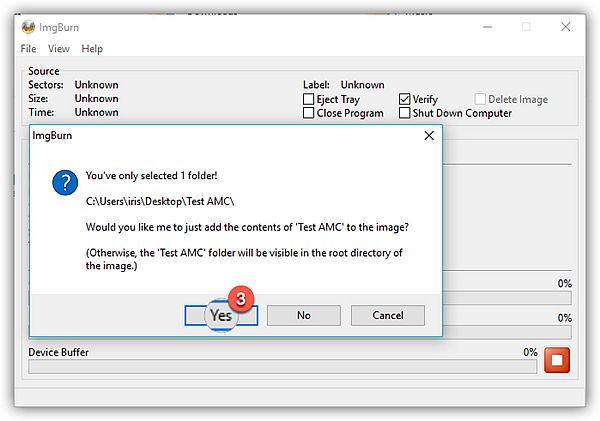
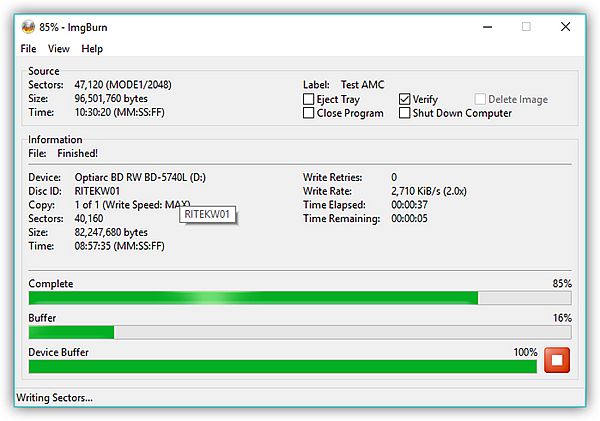
Step 3 Hit the Folder-to-Disc button to start creating your own CD. You will see a pop-up windows and click "Yes" to continue.
Wait until burning is completed, after that, you can play Apple Music on a CD with your car CD player.
6. How to Burn Apple Music to CD Without iTunes on Mac
As a Mac user, apart from iTunes, you can also use other excellent programs to burn Apple Music to CD. Burn is an easy-to-use tool that can help. Supported by macOS 10.9 or higher, it's safe and open source that offers CD-Text and mp3 tag editing features, definely a decent choice for CD burning.
Here's how to burn Apple Music on Burn:
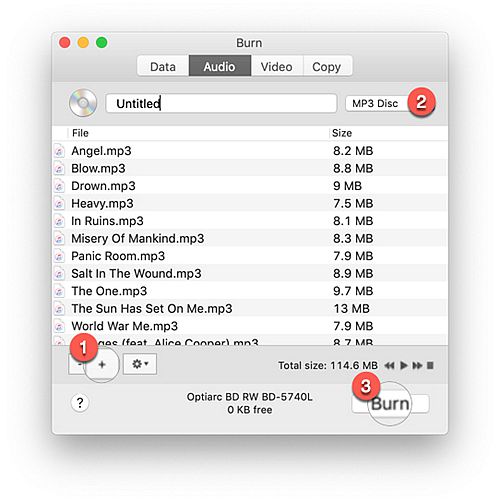
Step 1 Run Burn on Mac then you can see the main interface as below.
Step 2 Choose “Audio” and click "+" button to add your music files into the program. Next, select MP3 disc or Audio CD as the CD type from the upper right corner, then click to "Burn" to continue.
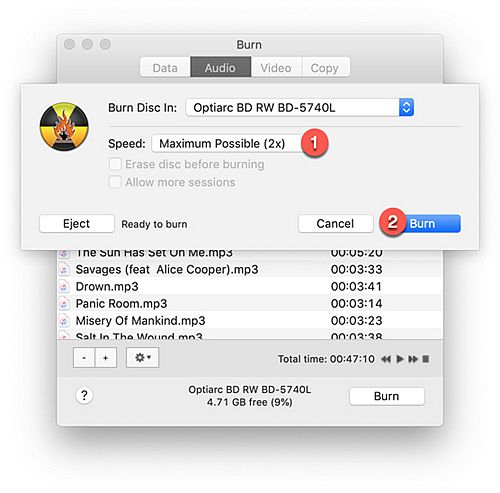
Step 3 Now you will see a pop-up window asking you to select the Speed, choose "Maximum Possible (2X)" and click "Burn" to start burning Apple Music playlists to MP3 disc.
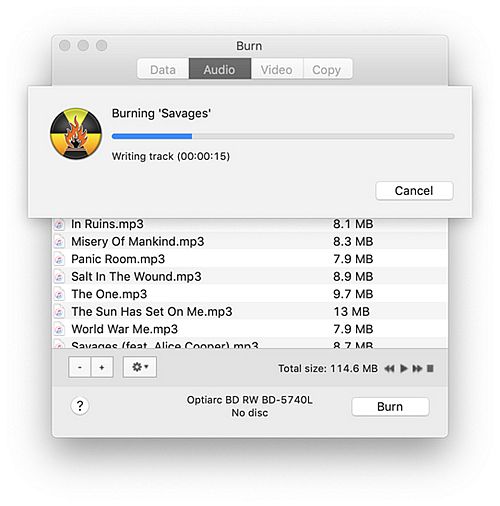
After a few minutes, you can successfully add Apple Music tracks to a CD and you can enjoy Apple Music on whatever CD player at ease.
Final Words
That's it! In a nutshell, if you want to burn Apple Music to CD, you have to make sure all things you need are ready: a reliable Apple Music converter, a CD burner, a blank CD and a CD burning program. Among them the Apple Music converter as the most important tool to decrypt the DRM of Apple Music, will decide the quality of burned music to a great extent.
Therefore, TuneFab Apple Music Converter must be your first choice for it not only provides up to 10X speed of conversion, but also guarantees to keep your music tracks without quality loss.
Hope this guide will be helpful to you. If you have any question about the CD burning process, feel free to let us know in the comments!


