To stream the right music while you are preparing for an important examination or working on a Powerpoint presenttion, you can manage songs queue with Apple Music Up Next feature or create different playlists for different occasions. Managing songs playing next in Apple Music queue will not only give you a better listening experience but also help you focus on the work you are doing and become more productive. Just check this ultimate guide to manage songs playing next in Apple Music queue.
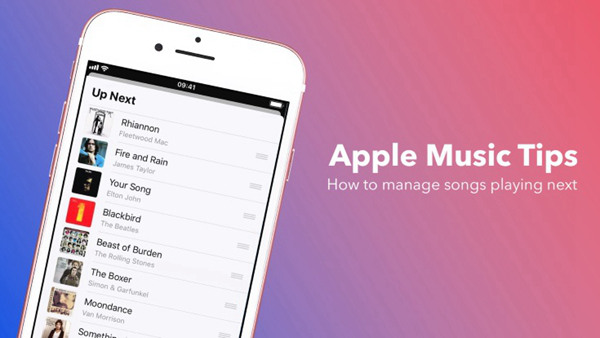
Part 1. Brief Introduction: Up Next Feature on Apple Music
The Up Next feature was adopted in many Apple products, including Podcasts, iTunes and Apple Music and is well-reputed. This feature is welcomed especially among party lovers who need to get ready their party playlist to make songs play in queue as they want. Even if you're in the middle of a certain playlist or album, you can quickly add other tracks. You can view, rearrange, add or remove songs in Up Next list. Just check the guide below to manage the songs playing next in Apple Music.
Part 2. How to View Songs Playing Next
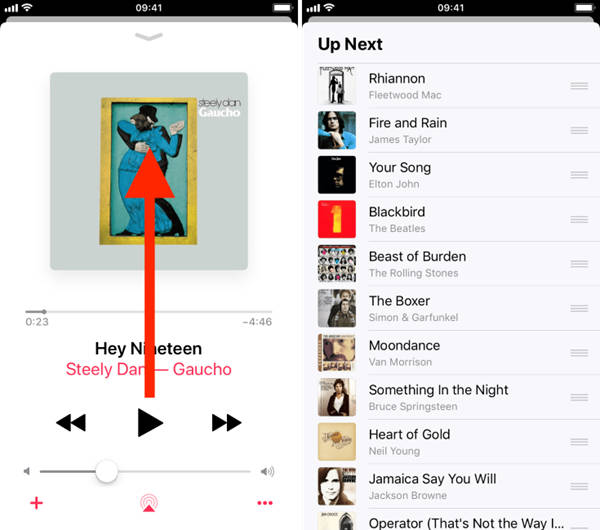
Step 1. Enter the main music card view while playing a song in Apple Music. Then, swipe up and you will see the queue of songs as shown below.
Your songs will obey the same sequence to play music unless you choose shuffle playing mode. To add, rearrange and remove songs, you just need the simple operation as part 2 indicates.
Part 3. How to Rearrange/Add/Remove Songs Playing Next
1. Guide to Rearrange Songs in Apple Music Up Next Feature
When you want to play the songs later or would like to play it ahead, you can easily rearrange them.
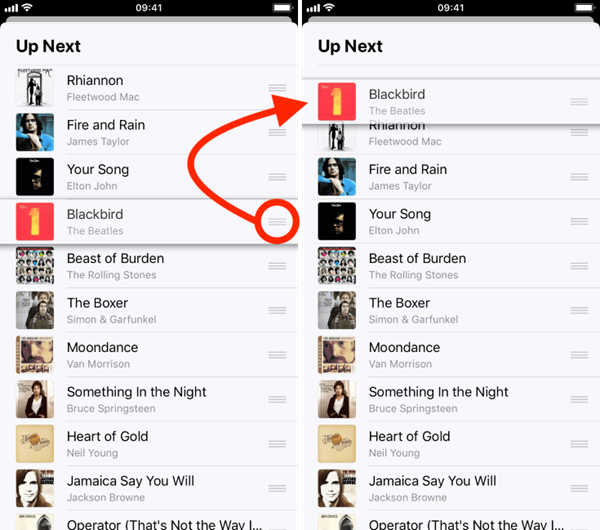
Step 1. Just check and hold on the song you would like to rearrange.
Step 2. Then the song you chose hovers up with the three lines button appeared.
Step 3. Tab on the button and drag and drop the song to where you like.
2. Guide to Add Songs Playing Next in Apple Music App
You can also browse playlists/albums to add songs you would like to the Up Next list:
Step 1. Locate the playlist/album you want.
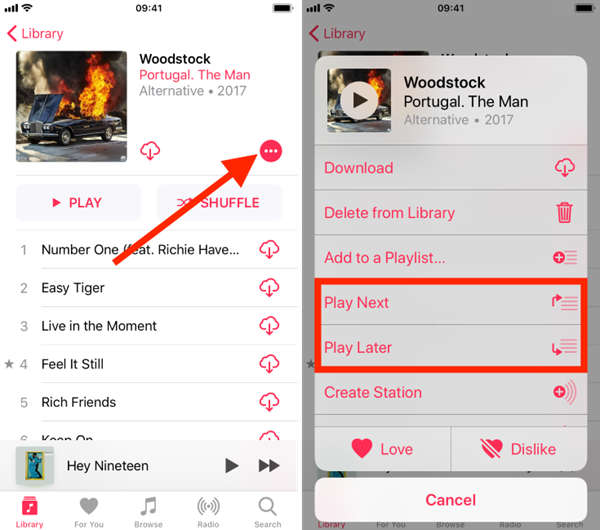
Step 2. Hit on the "..." button to bring up detailed option.
Step 3. You will have "Play Next" and "Play Later" for option. "Play Next" enables you to play the selected songs in desired order, while "Play Later" will list the songs at the end of the queue.
3. Guide to Remove Songs Playing Next
The steps to remove Apple Music queue is much simpler than you can imagine.
Step 1. Locate the song you don't want to be included in the playlist.
Step 2. Swipe from right to left on the song to remove it.
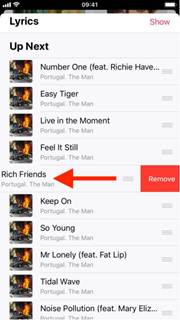
Note: To remove songs, you can only remove them one at a time.
Part 4. How to Sort Playlists in Apple Music Efficiently
As a music lover, I believe that you will have lots of playlists added to Apple Music. To keep everything under control, many party DJ prefers creating diferent playlists that fits different party themes. In this part, I would like to share with you a simple solution to sort your playlists in Apple Music efficiently.
Step 1. Open Apple Music on your iPhone.
Step 2. Enter "Library" tab from the bottom of the interface.
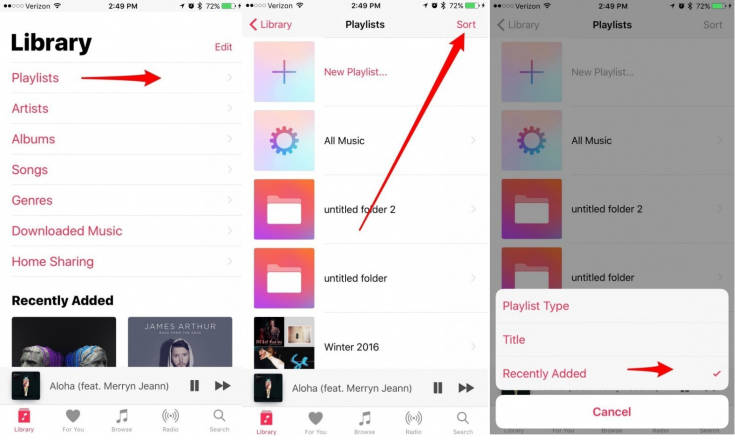
Step 3. Click into the "Playlists" session.
Step 4. Then, you will see all the playlists listed in the interface. Hit on "Sort" from the top right corner.
Step 5. In the pop up interface, you will get the following options: "Playlist Type", "Title" and "Recently Added". You can choose the one you want and the one chosen will have a red tick next to it.
Bonus Tip: How to Play Apple Music on Other Devices
Not every DJ equipment enable us to play Apple Music on it because of the DRM protection and the music format. To play Apple Music on more devices including DJ equipment, you need the help of TuneFab Apple Music Converter.
TuneFab Apple Music Converter works perfectly on converting Apple Music to MP3, M4P, M4A, M4R, AIFF, FLAC, AU, AC3, MKA and AAC. As you can see, the supported formats are surprising. With it, Apple Music can be played on almost any device. The DRM protection can be automatically removed and songs are savely converted lossely. Just make sure that your Apple music is well synced with iTunes.
Step 1. Download and install TuneFab Apple Music Converter
Download and install TuneFab Apple Music Converter on your computer and make sure that iTunes is well installed. Then, when launching the music converter, iTunes will be brought up and your iTunes playlists will be detected and listed in the interface.

Step 2. View and Select Apple Music
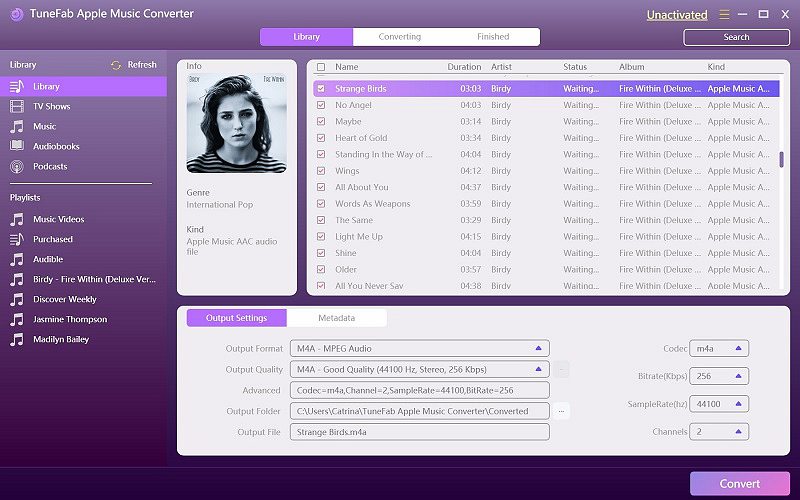
You can browse through the playlists and albums to locate the Apple songs you would like to play on other devices.
Step 3. Choose Output Formats and Folders
Go to "Output Settings" from the bottom and choose your favorite output format. MP3 will be highly recommended becaue it's the most popular music format available. You can also customize bitrate, sample rate, and so on to get better sound quality.
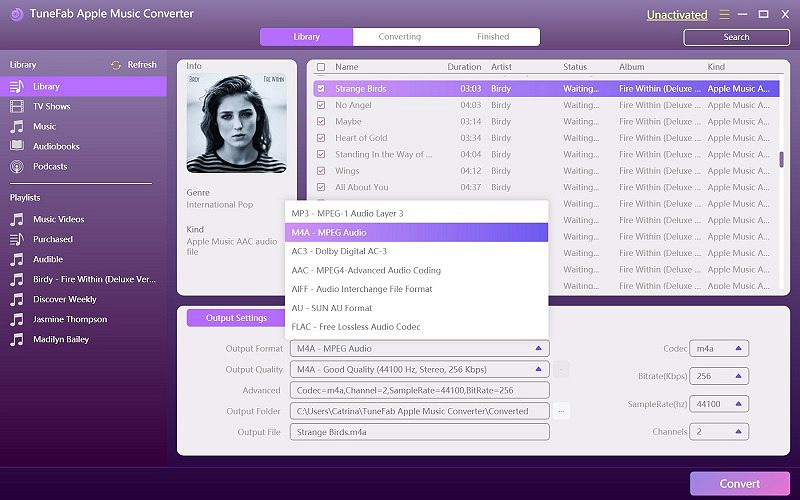
Step 4. Start Converting Apple Music to MP3
After choosing all the songs you want, hit on "Convert" to start the conversion.

Step 5. Copy Converted MP3 Files to Any Device
Now, you can locate the output format to find your converted songs and copy them to the device you like.
Hope this guide helps you solve your confusion on how to view, rearrange, add and remove Apple Music queue with the Up Next feature. TuneFab Apple Music Converter is the perfect Apple Music converting tool for you to manage songs on your iPhone/iPad. Just let me know if you need any assistance on issues using Apple Music app.
To stream the right music while you are preparing for an important examination or working on a Powerpoint presenttion, you can manage songs queue with Apple Music Up Next feature or create different playlists for different occasions. Managing songs playing next in Apple Music queue will not only give you a better listening experience but also help you focus on the work you are doing and become more productive. Just check this ultimate guide to manage songs playing next in Apple Music queue.

Part 1. Brief Introduction: Up Next Feature on Apple Music
The Up Next feature was adopted in many Apple products, including Podcasts, iTunes and Apple Music and is well-reputed. This feature is welcomed especially among party lovers who need to get ready their party playlist to make songs play in queue as they want. Even if you're in the middle of a certain playlist or album, you can quickly add other tracks. You can view, rearrange, add or remove songs in Up Next list. Just check the guide below to manage the songs playing next in Apple Music.

Part 2. How to View Songs Playing Next
Step 1. Enter the main music card view while playing a song in Apple Music. Then, swipe up and you will see the queue of songs as shown below.

Your songs will obey the same sequence to play music unless you choose shuffle playing mode. To add, rearrange and remove songs, you just need the simple operation as part 2 indicates.
Part 3. How to Rearrange/Add/Remove Songs Playing Next
1. Guide to Rearrange Songs in Apple Music Up Next Feature
When you want to play the songs later or would like to play it ahead, you can easily rearrange them.
Step 1. Just check and hold on the song you would like to rearrange.
Step 2. Then the song you chose hovers up with the three lines button appeared.
Step 3. Tab on the button and drag and drop the song to where you like.

2. Guide to Add Songs Playing Next in Apple Music App
You can also browse playlists/albums to add songs you would like to the Up Next list:
Step 1. Locate the playlist/album you want.
Step 2. Hit on the "..." button to bring up detailed option.
Step 3. You will have "Play Next" and "Play Later" for option. "Play Next" enables you to play the selected songs in desired order, while "Play Later" will list the songs at the end of the queue.

3. Guide to Remove Songs Playing Next
The steps to remove Apple Music queue is much simpler than you can imagine.
Step 1. Locate the song you don't want to be included in the playlist.
Step 2. Swipe from right to left on the song to remove it.

Note: To remove songs, you can only remove them one at a time.
Part 4. How to Sort Playlists in Apple Music Efficiently
As a music lover, I believe that you will have lots of playlists added to Apple Music. To keep everything under control, many party DJ prefers creating diferent playlists that fits different party themes. In this part, I would like to share with you a simple solution to sort your playlists in Apple Music efficiently.
Step 1. Open Apple Music on your iPhone.
Step 2. Enter "Library" tab from the bottom of the interface.
Step 3. Click into the "Playlists" session.
Step 4. Then, you will see all the playlists listed in the interface. Hit on "Sort" from the top right corner.
Step 5. In the pop up interface, you will get the following options: "Playlist Type", "Title" and "Recently Added". You can choose the one you want and the one chosen will have a red tick next to it.

Bonus Tip: How to Play Apple Music on Other Devices
Not every DJ equipment enable us to play Apple Music on it because of the DRM protection and the music format. To play Apple Music on more devices including DJ equipment, you need the help of TuneFab Apple Music Converter.
TuneFab Apple Music Converter works perfectly on converting Apple Music to MP3, M4P, M4A, M4R, AIFF, FLAC, AU, AC3, MKA and AAC. As you can see, the supported formats are surprising. With it, Apple Music can be played on almost any device. The DRM protection can be automatically removed and songs are savely converted lossely. Just make sure that your Apple music is well synced with iTunes.
Step 1. Download and install TuneFab Apple Music Converter
Download and install TuneFab Apple Music Converter on your computer and make sure that iTunes is well installed. Then, when launching the music converter, iTunes will be brought up and your iTunes playlists will be detected and listed in the interface.

Step 2. View and Select Apple Music
You can browse through the playlists and albums to locate the Apple songs you would like to play on other devices.

Step 3. Choose Output Formats and Folders
Go to "Output Settings" from the bottom and choose your favorite output format. MP3 will be highly recommended becaue it's the most popular music format available. You can also customize bitrate, sample rate, and so on to get better sound quality.

Step 4. Start Converting Apple Music to MP3
After choosing all the songs you want, hit on "Convert" to start the conversion.

Step 5. Copy Converted MP3 Files to Any Device
Now, you can locate the output format to find your converted songs and copy them to the device you like.
Hope this guide helps you solve your confusion on how to view, rearrange, add and remove Apple Music queue with the Up Next feature. TuneFab Apple Music Converter is the perfect Apple Music converting tool for you to manage songs on your iPhone/iPad. Just let me know if you need any assistance on issues using Apple Music app.


