Music streaming industry has seen rapid growth over the past decade. As you can directly stream high sound quality music, downloading music is no longer a necessary move.
But while streaming, it creates cache files that may eat up the internal storage of your device and therefore make it hard to operate. Take Amazon Music as an example, normally, a music stream provided in High Quality can have an average file size of 6 MB at 256 Kbps. And Amazon's Hi-res music streaming even provides CD-quality streams that can reach around 51 MB for a 3 or 4-minute song.
Inevitably, much space on your playback device is occupied whether you are using Amazon Music free or having a paid subscription. For those who use a music playback device that supports SD cards for expanding memory space, storage becomes easy to free up. And this article includes everything you need to know about downloading Amazon Prime/Unlimited Music to an SD card and changing storage for Amazon Music to free up more space on your device.
Related Articles
Part 1. Download and Save Amazon Music to SD Card on Android Directly
An obvious difference between Amazon Music free and Amazon Prime/Ulimited membership is whether the download option is available. In other words, Amazon Music subscribers can simply and directly change and move the saving location and ultimately export Amazon Music to SD card. And the following is a simple guide on how to save Amazon Music to phones directly.
This doesn't mean that Amazon Music Free users are out of luck. There still exists an easy and feasible trick to help you download Amazon Music to SD card, you can directly refer to part 2 in this article.
Step 1. Run the Amazon Music app on your mobile phone and tap "My Music" in the bottom menu.
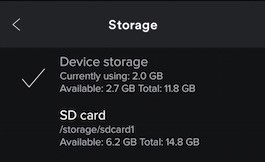
Step 2. Select "Settings" and then choose "Storage" options.
Step 3. Select SD card to be the storage path.

After you finish the setting, the songs you download next time will automatically be saved on the SD card.
Note:
After you download and move Amazon Music to the SD card on Android officially, you can locate the downloaded Amazon Music on the following default path: "mnt/extSdCard/Android/data/com.amazon.mp3/files/Music".
Part 2. Download and Transfer Amazon Music to SD Card for Playing on Any Media
The first method is the easiest way to move Amazon Music to SD card, but there are also some disadvantages. Once you have your Amazon Music membership expired, the songs you have downloaded will become unavailable even if they are stored on an SD card. And you can just listen to these songs on the Amazon Music App, while other media cannot. Therefore, an effective way to keep the music files is to use an Amazon Music converter.
TuneFab Amazon Music Converter can help you fix the problem. It’s an integrated web player that can download and convert Amazon Prime/Unlimited music to multiple formats including the common MP3, WAV, and FLAC. During the music conversion process, the converting speed can reach 5X faster while keeping the original quality of the Amazon songs. Besides ensuring the audio conversion efficiency, it is worth noting that the music conversion process doesn't impair your playback experience on other devices.
🔥 The Key highlight of TuneFab Amazon Music Converter:
● Mainstream output formats: It can convert almost all the Amazon Music files (playlist/album/song/podcast) to commonly used audio formats, including MP3, M4A, WAV and FLAC.
● Output parameters can be adjusted flexibly: To make sure you get high-quality output files, TuneFab Amazon Music Converter allows you to customize SampleRate and Bitrate based on personal preference.
● Original ID3 Tags can be preserved well: In order to have better management of these downloaded files later, the program can help you save the ID3 information to check back offline.
● 5X conversion speed and batch conversion: According to the actual network condition and the computer performance itself, the converting speed can be up to 5X, and even the function of batch conversion can be offered to save your time.
● Converted sound quality can remain at its origin: Ensuring you have a better offline music experience, the tool retains the Amazon Music HD sound quality to the maximum extent.
● Easy operation and user-friendly interface: You can download and convert Amazon Music without installing Amazon Music software, and the conversion steps are quite simple even if you are a beginner.
Check out this video to know more about how Amazon Music Converter works.

How to Download Amazon Music via TuneFab
Step 1. Download and Launch TuneFab Amazon Music Converter
After you launch TuneFab Amazon Music Converter, please sign in to your Amazon account if you have had one or create one to log in. The converter will fail to convert the songs without getting access to the Amazon Music library.
100% Secure
100% Secure
Step 2. Tweak Ouput Settings
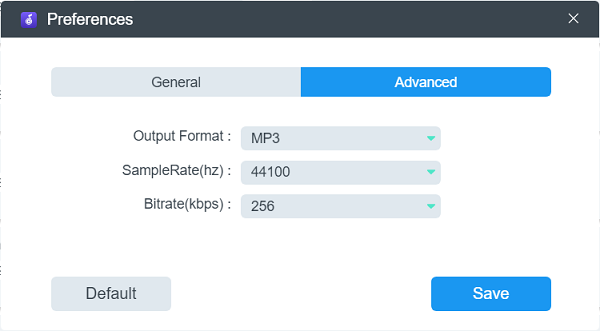
Click the settings menu icon from the top-right corner and find "Preferences" to adjust the settings. Here you can change the "SampleRate" and "Bitrate" of the songs, and these options are in the "Advanced" column.

Step 3. Choose A Playlist to Convert
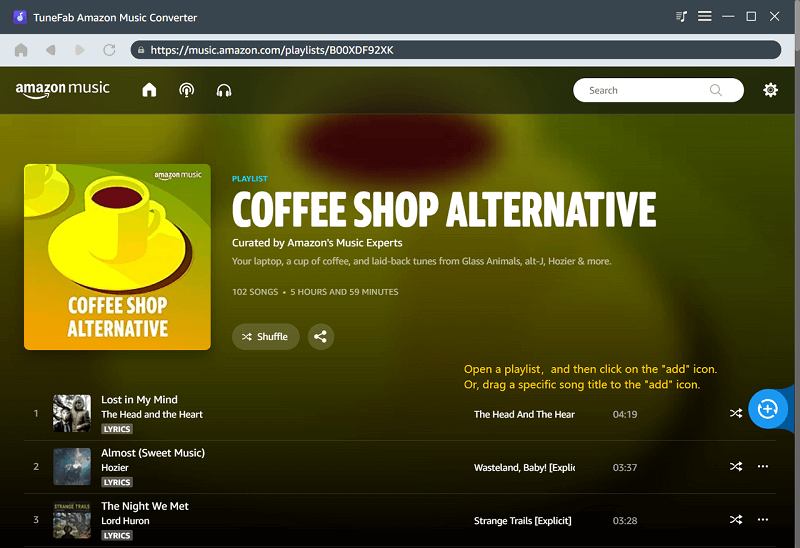
After you sign in to your account and finish the settings, you can begin to choose a playlist that you want to download and add songs to the converting list. The blue button on the right side is the "add" icon.

Step 4. Set Output Folder and Output Format
When you finish selecting and adding the playlist to the converting list, you can choose a new output location on the bottom-left of the converting window. The output format can be changed on the top-right of the page.

Step 5. Convert Amazon Music Songs
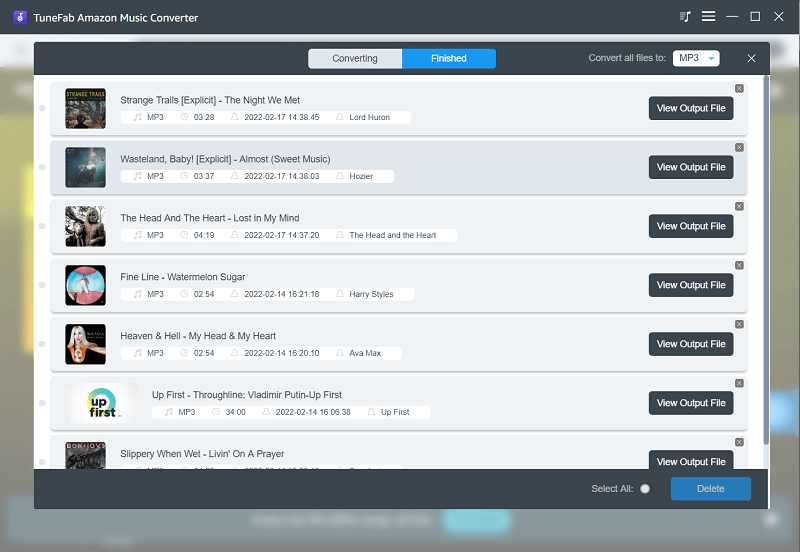
After all preparation is done, just waiting for conversion completed. Songs that are successfully converted will be placed in the "Finished" column. You can click “View Output File” to check the offline files on your device.

How to Save Converted Amazon Music to SD Card
When you have converted and downloaded the songs to your computer, you can now save converted Amazon Prime/Unlimited Music to an SD card or to any other devices you like. Here is the detailed guide on how to move the music files to the SD card.
Step 1. Insert the SD card into your computer via a card reader.
Step 2. Find the downloaded Amazon music folder on your computer.
Step 3. Right-click to copy and paste all the amazon songs to the SD card folder.
With all the steps done, you are now successfully finishing the whole process of downloading Amazon Music to SD card.
Part 3. FAQs on Amazon Music Downloads to SD Card and Management
After you have known about how to move Amazon Music to an SD card, there may also be some aspects you are interested in, like music classification, detailed tips for Amazon Music Converter, and playback on the Amazon Music app.
Q1: Is it easy to classify the downloaded songs?
A: Yes. TuneFab Amazon Music Converter will remain ID3 tags like title, artist, album, date, genre, etc. If you have converted the songs to MP3 and FLAC, this information should help you better manage your music library.
Q2: Can I play songs already saved in SD card on Amazon Music?
A: Yes. You just need to check out the following steps.
Step 1. Click the top-right corner and you will find your account and "Settings".
Step 2. Go to the "Settings" column and find the "Music Management" list.
Step 3. Find the option “Automatically Import Music From” and choose it.
Step 4. Tap “Select Folder” button and choose your SD card folder to be the import folder.
After that, the songs already downloaded to your SD card will appear in the Amazon Music Library, and you can play them on Amazon Music.


