For some people who have stored a large database in iTunes Library, it would be quite necessary to back up the contents in iTunes Library. For security, copying iTunes Library to an external hard drive would be a really good choice. You can save all contents in your iTunes Library. So, how to copy the contents of iTunes Library to external hard drive? There are two methods provided for you to deal with this.
Part 1. Back up iTunes Library to Hard Drive with iTunes
Firstly, you can use the regular way to backup your iTunes Library, that is to use iTunes.
Step 1. Open iTunes on your PC or Mac.
Step 2. Go to File > Organize Library.
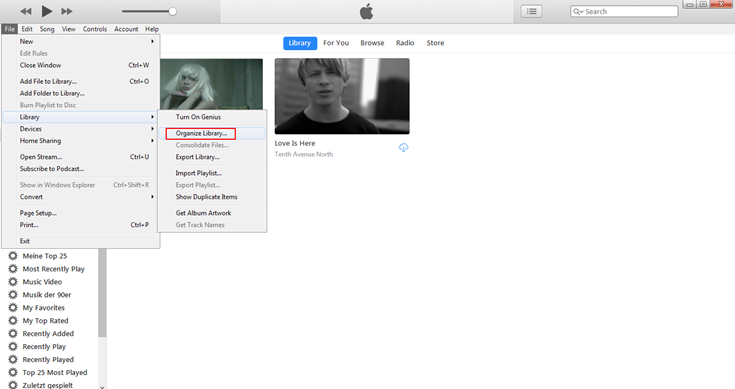
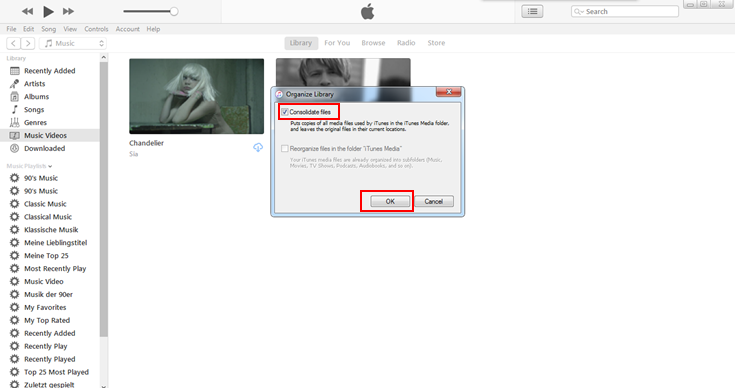
Step 3. Tap on "Consolidate files", then click on OK.
Step 4. Find your iTunes Media folder in your iTunes folder.
● Mac: Finder > username > Music
● Windows Vista or later: \Users\username\Music\
● Windows XP: \Documents and Settings\username\My Documents\My Music\
Step 5. Then connect your hard drive to the computer with a USB cable, and drag the folder into the drive.
Part 2. Remove DRM from iTunes Library Contents and Move them to External Hard Drive
Except for using iTunes, as we know, the contents such as music, audiobooks, videos which are purchased or rented from iTunes Store, Apple Music, etc. and store in iTunes Library are mostly protected by DRM. As for these contents, if you want to save them to your external hard drive, it would also be a good choice to remove the DRM from them and move them to the hard drive directly. To achieve this goal, you need the help of two third-party programs, and that is TuneFab Apple Music Converter and TuneFab M4V Converter.
Remove DRM from DRM-ed Music and Audiobooks in iTunes Library
To remove DRM from the music and audiobooks in iTunes Library, TuneFab Apple Music Converter would be a good choice. You can select the music and audiobooks lists from your iTunes Library directly in TuneFab Apple Music Converter program. The program also provides a 16x faster conversion speed and you can save much of your time to get the DRM-free music and audiobooks.
Guidance to use TuneFab Apple Music Converter:
Step 1. Download TuneFab Apple Music Converter
Firstly, download TuneFab Apple Music Converter and install it on your computer (both Windows and Mac version are provided). Then run it.

Step 2. Select Music/Audiobooks
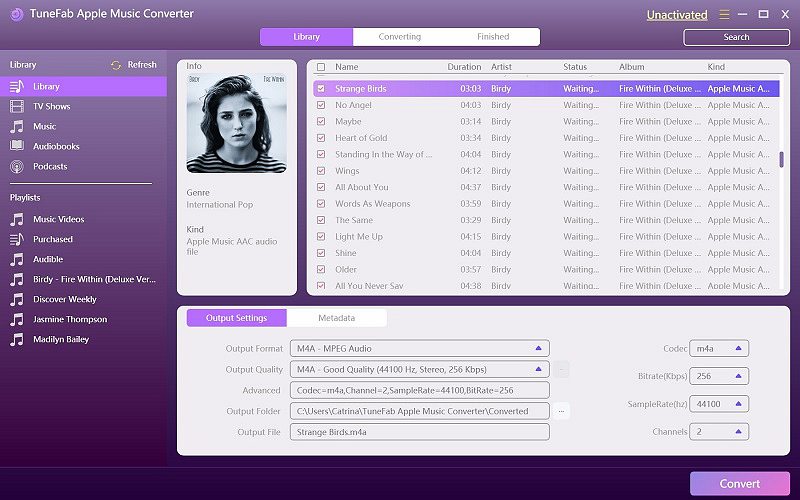
You can directly select the music or audiobooks that stored in your iTunes Library in TuneFab Apple Music Converter.
Step 3. Output Settings
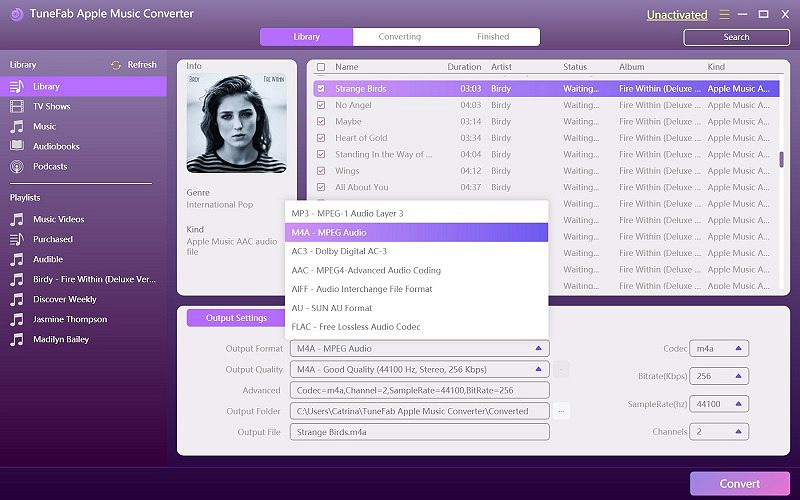
From the box under selection list is the output settings box. You are able to select the output format and output folder for your converted contents.
Step 4. General Settings
In Options, you can select the conversion speed from 1x to 16x faster according to your need.
Note: As for audiobooks conversion, you can click on the "Metadata" option to save the chapter information if you are going to convert the audiobooks to MP3/M4A format.

Step 5. Convert the Files
Finally, click on "Convert" button to convert the music and audiobooks in iTunes Library to DRM-free files.

Part 3. Remove DRM from DRM-ed Videos in iTunes Library
If you want to remove DRM from the videos in your iTunes Library, then choose TuneFab M4V Converter. For videos conversion, TuneFab M4V Converter can do the DRM removal perfectly and save the converted videos in high quality. The conversion speed of videos DRM removal can even reach 30x faster. You just need 4 simple steps to get the DRM-free videos from your iTunes Library.
Step 1. Download TuneFab M4V Converter
Download and install TuneFab M4V Converter to your computer. Select the right version for you (Windows and Mac versions are provided).
Step 2. Add Files to TuneFab M4V Converter
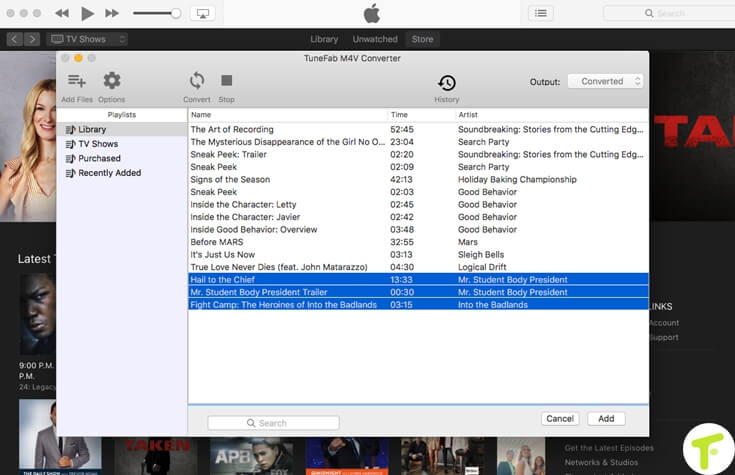
Click on "Add Files" to select the videos from your iTunes Library to TuneFab M4V Converter.
Step 3. Preserve Audio Tracks and Subtitles
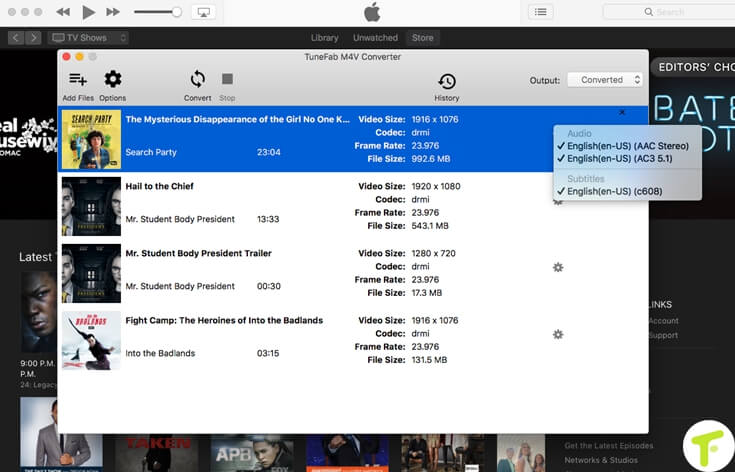
Select to preserve the audio tracks and subtitles of the videos. You can also select to preserve them by default. Just skip this step.
Step 4. Convert the Videos
Last step is to convert the videos into DRM-free ones. You would get the videos in just a few minutes.
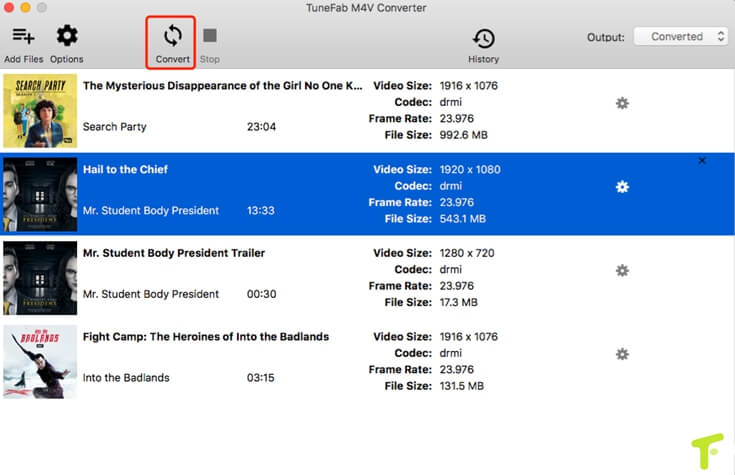
When the conversion is done, you can get the DRM-free music, audiobooks, and videos that are originally stored in your iTunes Library. It is able to move them to the external hard drive now directly since you are not limited by the DRM-protection now. These DRM-free contents can be stored on your hard drive as long as you like and you needn't worry about their loss.
So which method above you prefer? Try it now!


