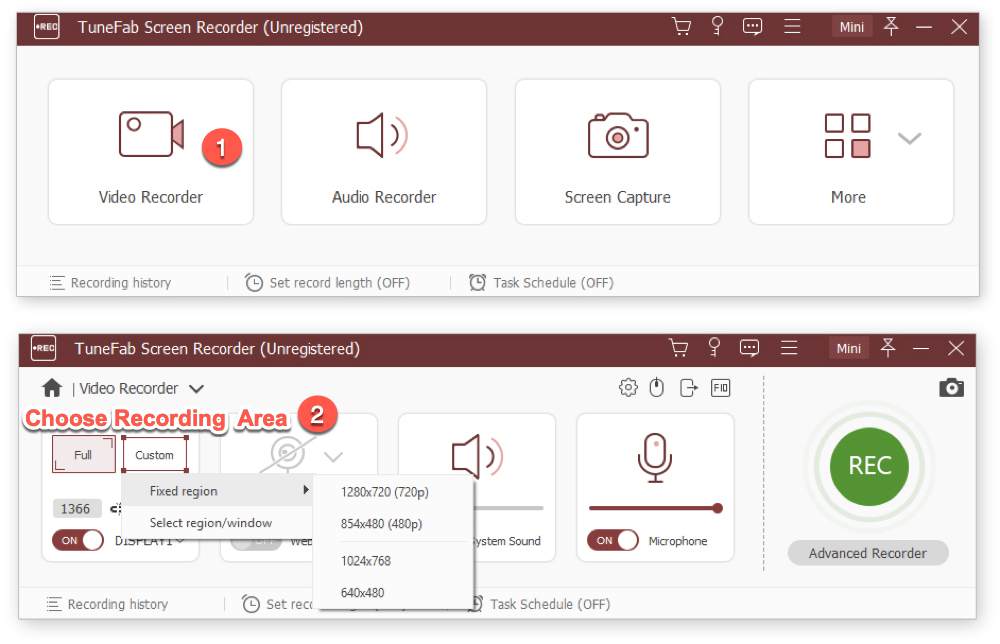
Instead of record your Screen with Full screen, TuneFab Screen Recorder allow you to record screen on your Windows or Mac with Custom screen. In this post, we will teach you the way to record your screen with Custom screen by taking Windows as example.
Full Guide: Record Screen on Windows/Mac with Custom Screen
Step 1. Hit "Video Recorder" to enter the video recording mode.
Step 2. On the first options, hit "Custom" tab to get ready to record the video.
As you can see that there are 2 options for you to choose for recording your video. On the fixed region, you can choose the 1080p, 720p, 480p for high quality recording according to your computer resolution ratio. Here we choose 720p as it is the basic resolution ratio.

Step 3. Hit the "Gear" button to enter the preference page.
After choosing the recording mode, now you can hit the Gear button to enter the Preference page to select your video format as well as the video quality. If you want to record your screen with high quality, then you can take the following video parameter into consideration, which is high recommend by us.
For Windows:
Choose the output quality from the H.264 container, such as MP4.
Video quality should be high quality.
Audio format: MP3.
Audio quality should be high quality.
Video Frame rate: 24 fps
For Mac:
Choose the output quality from the H.264 container, such as MP4.
Video quality should be middle quality.
Audio format: MP3
Audio quality should be high quality.
Video Frame rate: 24 fps.
Step 4. Hit "REC" to record the video
Now, you may have choosed all the video settings and just one step closer to record your screen. Hit "REC" to record the video and wait for 3 seconds countdown. When the recording is finished, hit Red-square to end up the whole recording. Click "Save" button to keep your recorded video if it is fully meet your needs.


